Tuesday, April 28, 2009

When life kicks your ass, knit socks!

I finished another couple of shawls recently and I have a sweater languishing in my project bag, but I can't seem to focus on anything bigger than a sock at the moment.

pomatomus beginning

Forest Canopy (ravelry link) and the Fountain Pen shawl (ravelry link) were very quick knits.

Fountain Pen got debuted at a friend's wedding a couple of weeks ago. If I can find a photo of it in action, I'll post it. Oh yes, and Handmaiden Mini Maiden is like yarn crack. I'm definitely going to use it again.

fountain pen

Here's Ricky inspecting Forest Canopy.

forest canopy

I knit this out of Lorna's Laces Shepherd worsted, which makes it a warm and sturdy, yet soft wrap for my chilly office. Also, it's cold out again.

Sunday, March 22, 2009

Wing 'o the Moth

New projects are more fun than repairing old ones. I just finished a shawl that I actually get to keep this past week.


This was a fun and easy knit, except for the bits where I didn't pay enough attention to the stitch pattern in the body of the shawl. I also added beads to the twin leaf border - not many, but enough to add a bit of sparkle (details on the ravelry project page). The yarn is a bit delicate (it looks really fragile in places), so I'm keeping the leftovers in case of emergency repair work. We'll see how this holds up over time.

Friday, February 13, 2009

Winter gear

First, some lovely alpaca mittens that Ivanova made me and I promised ages ago that I would post a pic of them:


To go with them I made the wavy scarf from Knitty using Knit Picks Andean Silk yarn. This stuff is incredibly soft and warm. I highly recommend it. I'm not sure why this pattern got a "tangy" rating from Knitty. The pattern even says that it's easy peasy, as long as you use a row counter.

My favourite model

Here is my DS modelling the lovely Baby Surprise Jacket that Ivanova was kind enough to make for him. I've been meaning to post these pics for quite a while now...


Friday, January 30, 2009

Sweater surgery preliminaries

Arisaig gets a lot of wear, and usually that's a good thing. Unfortunately somewhere between Salt Lake City and Boston during a business trip last week, I noticed a hole in the cuff.


After getting really pissed, I realized that there's an easy fix. The sleeves are too long on the sweater, so I decided to rip back to a better length and knit back down.


I used circulars as a lifeline through the stitches in the row where I want the lace pattern to begin. I'll post updates as the surgery progresses.

Thursday, January 29, 2009

Great big huge sewing project (part 1)

So here's the deal: C and I got married (finally) on December 27. In a moment of insanity last winter, I decided to sew my own wedding dress (photos on Flickr).

The bodice was sewn from a modified version of the Truly Victorian pattern TV490, which I altered to lace up rather than button up in the back. The skirt is TV221. The only reason why I'm still sane after this experience is that Truly Victorian patterns are incredibly well written, are very easy to resize and come with great instructions. C was also a big help when I was fitting the bodice and helped mark the hem on the skirt.


The fabric is red doupioni silk underlined with denim. I used spiral steel and white steel boning for both the bodice and the corset. I lined the bodice with rayon, but also faced the hems with gold/pink shantung silk bias strips.

Rather than use the typically puffy sleeves found on bodices during the Victorian period, I drafted a pretty generic short sleeve, which was cut on the bias and lined in the shantung.


I'll add more details in my next post, and show off the petticoat and corset. I also have to point out the bouquet and C's boutonniere, both created by the great people at the Welded Garden. The bouquet is currently sitting on my fireplace mantle in grandma's crystal vase.

C also got a new hat for xmas (ravelry project link).

Saturday, December 13, 2008

The final step; hemming (ugh!)

I'm quite happy that I'm nearly done this gown, and just in the nick of time for the wedding. I have ironed and pinned the hems (some are less perfect than others - oops!) and my remaining 2 evenings in town before crazy traveling will be spent basting the hems in place so I can sew them invisibly on the approximately 12 hours of train rides I will be taking in the next 5 days. And the 8 hour plane ride. And the additional 5 hour flight to get from the in-laws to the wedding.

So now for the pics: front, back and side views...


Now for the project details; some are repeated from previous posts on this gown.

Patterns:
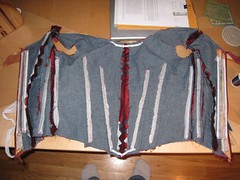
Corset: The custom corset pattern generator found here.
Materials: cotton canvas, rigilene boning and cotton bias tape.
Things I'd do differently if I were to do it again: I'd cut it an inch smaller at the bust because it expanded over time. Other than that I quite like it and would readily use this pattern again. I've never made a corset before but my husband *loves* it. That's saying a lot for how this pattern looks made up and in terms of fit. I refer you to previous posts for pictures.

Shirt: a pattern I found on the internet somewhere, linked to in a previous post.
Materials: Cotton lawn.
Things I'd do differently if I were to do it again: I would make the collar/neckline 0.5 inches (or so) wider. I would also NOT take the ruffles from the selvedge edge (because most fabrics don't have a real selvedge anymore, only fuzzy threads hanging from the long edges of the fabric which I had to trim away very carefully) and would instead have cut a strip of fabric twice the desired width of the ruffle and folded it in half along the long edge, thus making a ruffle with twice the thickness.

Underskirt: cutting directions from Your Wardrobe Unlock'd masterclass on a pirate gown, cartidge-pleated option.
Materials: Thai silk taffeta as fashion fabric, cotton muslin for lining.
Things I'd do differently if I were to do it again: I would NOT use muslin (unseen and ordered from the internet) for a lining because it was too lightweight. As much as I LOVE this taffeta (pure silk - yum!) it really dosen't want to be a skirt, it's too light to hang straight. A heavier lining would have helped. I intend to reclaim this fabric for another purpose - I'm thiking along the lines of a boned bodice. I also don't like the look of cartridge pleats. I doubt I'll use it again for this kind of skirt. They don't hang right with another skirt over it and I can see the pleating thread. I didn't repleat the skirt because Mom said it looked OK (thanks Mom!).


Overskirt: cutting directions from Your Wardrobe Unlock'd masterclass on a pirate gown, knife-pleated option.
Materials: Silk-blend taffeta as fashion fabric, middleweight linen as lining.
Things I'd do differently if I were to do it again: I woudn't line skirts unless they need more weight because the pleated waistband is very thick (couldn't get it into my sewing machine! ) and the skirt is very heavy. I love this fabric and I know it hangs well as a skirt on its' own. This 30-70 silk-rayon blend taffeta is now available from many internet retailers in the UK and is affordable (less than 5 pounds/meter everywhere I've seen it), comes in more colors every season, is washable, relatively wrinkle-free, is an excellent weight for dressmaking and drapes better than papery thai silk taffeta or dupioni silk. This will be my go-to fabric for dressy gowns.
Leave a comment if you want to know where I got it. Oh, and I love the look of the knife pleats. Yay for knife-pleats! YWU explained it better than any other internet site I looked at...

Bodice: Fitted English gown on page 79 of The Tudor Tailor.
Materials: Silk-blend taffeta as fashion fabric, middleweight linen for interlining, nasty cheap Thai silk-blend taffeta which lost its' color in the wash as lining (can you tell I'm bitter?).
General comments: I like it and it fits. Pattern drafting was tricky but I managed well enough with some fitting advice from Claudine on the Tudor Tailor Reader yahoo group. Thanks Claudine! You rock! Because I'm paranoid about wardrobe malfunctions I added a modesty panel to the bodice following the method outlined in the YWU instructions for the pirate bodice.
I also added rigilene boning up the center back to have a dramatic standing collar. I think it's a bit too dramatic now and may get a raised eyebrow or two from conservative family members, but at least they won't be raising eyebrows at the lack of modesty in my outfit. My husband said that he thinks I look like a puritan. (I know, puritans frowned at such 'manly' clothes on a woman...) I also put boning on the sides where the bodice fastens to prevent gapping. It works - 'nuff said.
I added ribbons for decorative effect and may have gone a little overboard...

Grumpy side-note: the silk-blend taffeta I ordered from Thailand is nasty nasty stuff. You can hardly sew it without damaging it so it's barely even fit to be a lining. If an e-bay deal seems to be too good to be true, it probably is. :(

Sleeves: taken from the Doublet Bodice pattern on page 83 of The Tudor Tailor.
Materials: silk-blend taffeta, nasty taffeta lining, linen facings on sides of sleeves fastened with hooks and eyes
General Comments: I chose this sleeve (as opposed to the numerous other options from the book) because I wanted a front-side seam that is partly open to show the white shirt underneath and this seemed like the best candidate. I also found the curved shape intruiging. My mom helped me with the assembly (from Skype) and it all came together nicely. I like the puffiness of the sleeve head and my husband says the sleeve is what makes the outfit look historical. I tried to fasten the sleeve with hooks and eyes but was unsuccessful so added ribbons instead. I also wanted detachable sleeves for several reasons; 1. I get sweaty. 2. Given the number of gowns in the book, it might be nice to have some mix-and-match-ability. I doubt that this choice is historically justifiable, but I don't think it's worth losing sleep over. I attached the sleeves to the armscyes by sewing 5 ribbons to each sleeve head (equally spaced), and sewing in thread loops in the armscye to tie the ribbons to. This detail was also taken from the YWU masterclass on the pirate gown sleeves.

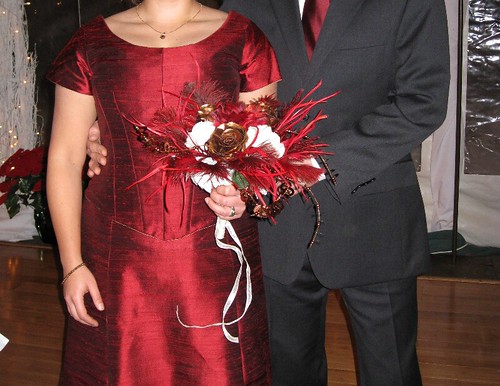
I'll post more pictures of the gown being worn at the wedding in the new year. If only thrace would post pictures of her red silk wedding dress! Oh the anticipation!

Happy holidays,

Ivanova

Sunday, November 23, 2008

Up next... the sleeves!

I've nearly finished the dress; all that's left is the sleeves which have to be pleated to fit the armholes. In my last post I showed the underskirt; as you can see it looked nicer on its' own than
under another skirt. If I have time I will remove the skirt from the waistband and rearrange the pleats so 12 inches at the center front are unpleated and the remainder of the skirt is pleated.
If I don't have time, I'll just live with it. Boo didn't comment about it so it's probably not a big deal. Now for the overskirt. I knife-pleated a 3-yard + wide skirt to fit my waist, and the end result is nice and swooshy. I also think that the knife-pleating looks and hangs nicer than the cartridge-pleating I used on the underskirt, but maybe the added weight and better drape of the fabric helps. I love this fabric; it's a silk-rayon blend taffeta that is washable, stain-resistant (on it's own, no weird chemicals are added) and drapes nicely. It also dosen't cost a fortune - always a plus. My only quibble is that it dosen't press into creases very well but this is probably related to the fact that it dosen't wrinkle easily. So on every edge that I want to be crisp I had to hand-sew some very tiny stitches about 1/8 of an inch away from the edge. I did this on the center front sides of the overskirt and all bodice edges.

Now for the bodice... I used the pattern for a high-collared bodice from The Tudor Tailor's pattern for a fitted English gown. It was tricky to fit because of the shape of my shoulder-neck area, but I got some useful advice from the Tudor Tailor Reader yahoo group and I'm quite happy with the end result, fit-wise. But for other-stuff? I'm not sure that this style is well-suited to a shiny material because I can see where my corset ends in the photo. Boo assures me that it's not noticeable in real life, but photos don't lie. He also think it looks like body armor. It fits quite well and has minimal ease, so I think that the shininess is the contributing factor. Stiff cylindrical corset + shiny close fitting layer which shows no curviness = body armor. Oh well, it'll have to do, I'll just wait to see what mom says. I do love the cut of the bodice and have every intention of making another one in a wool or velvet in the future. My final quibble is that the front edges don't meet using ribbons to close it, so I'll have to sew in some hooks and eyes under the ribbons to make the edges fit flush against each other. I *LOATHE* sewing in hooks and eyes. I added a modesty panel under the center front so that the corset wouldn't be visible under the gapping at the center front.

Ivanova